Hello Zedders
Some of you might know me for my sometimes seemingly crazy projects and experiments, this is one of them J
If you are having problems with your locks (this is for a boot lock, but similar concepts will apply to the door and glove box locks), be it sticking locks, broken locks or you simply want to match your key to a random lock – this is your post – note that (hopefully) this information can’t be used in any way to steal any cars J
Bit of background I bought some time ago this M roadster that had a boot lid that was beautiful but it had the holes for the boot rack, I am planning to keep that boot lid along with the rack and maybe install it if/when I do long trips but for everyday use I wanted to have a clean looking boot lid without the chrome plugs that seal the holes when the boot rack is not on.
After a long and hard search I managed to find probably the only M boot lid for sale in the UK in the last year, it was in great condition but it came with no internals whatsoever, save for the connecting rods luckily as they are M specific.
A quick trip to see @spurs fan in a coupe (thanks mate) he hooked me up with all the internals I needed to rebuild the boot lid internals, the only challenge was that I wanted the lock to match my other locks in the car so when I swap the boot lids (something that is quite easy to do) I didn’t have to swap the lock too or carry extra keys etc.
I had a look on the internet and couldn’t find any tutorials specific to this particular lock or the Zed but I found some for the E30s, so I thought I would write this to help anyone in a similar situation
What you need –
A donor boot lock (or whichever lock you are trying to key match)
A lock repair kit (better option) which is part 51218135959 or 51218135960 or other random E36 or Zed donor locks – you can use any repair kit (door, boot, Glove box) for an E36 as you only need the wedges/pin plates that come with it – just pick the cheapest or use the wedges from other random locks you might have lying around J
A good set of precision screwdrivers, pliers, paper towels to clean the lock, your favourite product to lubricate the internals of the lock (I used lithium grease) and a socket set.
Files or something to grind pin plates from donor locks if you haven’t got a lock repair kit.
Now on to the fun bit
To remove the lock from the boot there is a plastic access panel right behind on the inside of the panel, remove it carefully by prying out and pushing on the sides and it will come out.
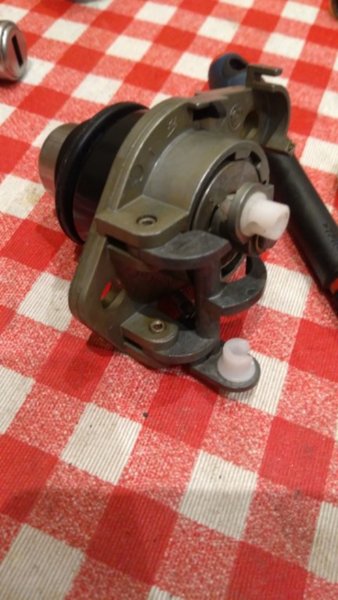
Inside there will be a couple of (I believe 8mm or 10mm) bolts attaching the lock to the boot lid, you need to disconnect first two connecting rods that are prised into two white plastic pieces on the lock, you can simply pull them out with a bit of care.
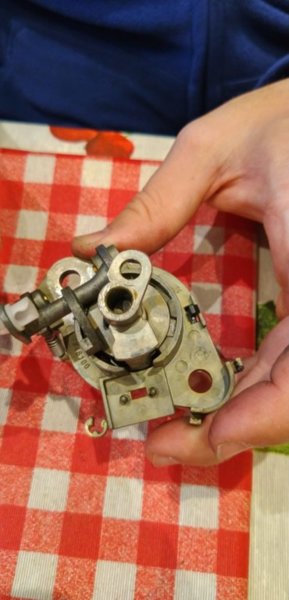
Once you have the lock in your hands you can start the disassembly – note that you don’t need the original keys from the lock to do that at all. I suggest you take pictures along the way to be able to determine how everything goes together when putting it back.
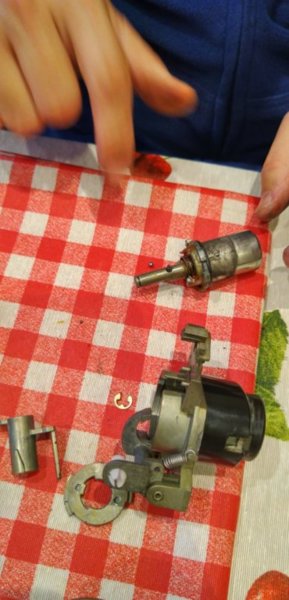
First step would be to remove a circlip that holds all of the parts together which is located at the back of the lock, I did this with the pliers and it was easy maybe you have other techniques.
Second step you can remove the lever/pin plate part that sits right underneath – do this carefully as there is a ball bearing that might come out, mine was covered in grease and got stuck inside, but you definitely want to find that ball bearing if it comes out, additionally there is a spring inside the lock shaft, mine stayed inside but watch out.
Note that on full disassembly you will end up with two small springs and two ball bearings, the ball bearings are all the same BUT the springs are different, take note of which one goes where.
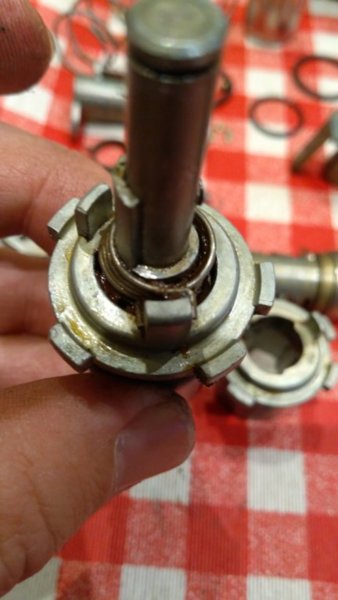
Now there is a plate that holds more of the internals together, the way to remove this is to push in and rotate this plate until you line it up with the cuts on the lock body and it comes out, I did this by pushing with two screwdrivers on the circle notches on the plate while rotating at the same time, there is a big spring underneath that might offer some resistance to you rotating it but keep at it until you have it out.
Once you have that out you will end up with the plate, the big spring and hopefully you will be able to fish the ball bearing and the small spring from the lock shaft.
Third step you can slide out the lock cylinder from the lock body, time to clean it carefully and check the condition of the first of two rubber seals on this lock. You can also remove a clock spring that sits at the end of the cylinder/tumbler.
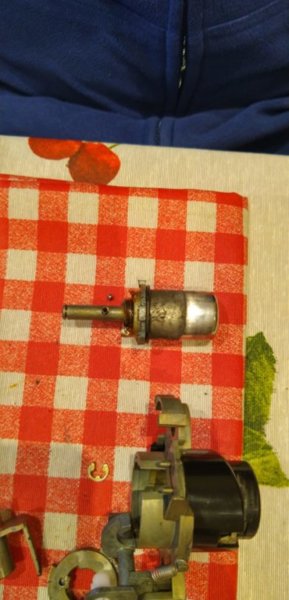
The fourth step would be to slide out the chrome sleeve out of the tumbler, the way to do this is to very carefully wedge a thin screwdriver between the chrome sleeve and the lock tumbler body right where the rubber o ring was and prise gently. Carefully work your way around it being careful not to damage that part or you won’t be able to slide it in again later, patience is your best tool here, and maybe some lubricant and it will eventually slide out.
There is a rubber o ring that seals the lock cylinder with this chrome sleeve, located at the bottom lip of that chrome sleeve
Once you complete that you need to be careful here, this is where the lock tumbler slides out of the cylinder and all the parts come flying if you are not careful.
Slowly push it out of the cylinder while with your fingers you stop all of the pin plates from flying out – there is also a ball bearing and a spring, in retrospective if you complete this step by doing this part with your hands and the lock inside a clear plastic bag so you can see what you are doing that will help you avoid losing any parts.
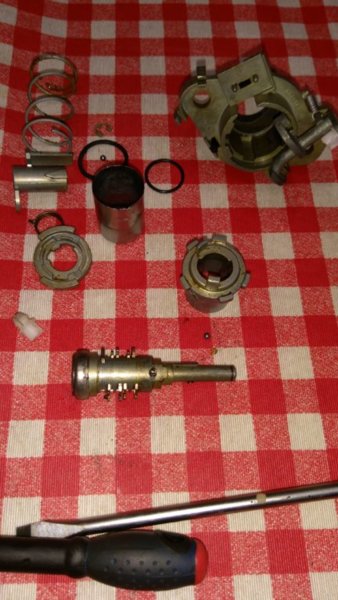
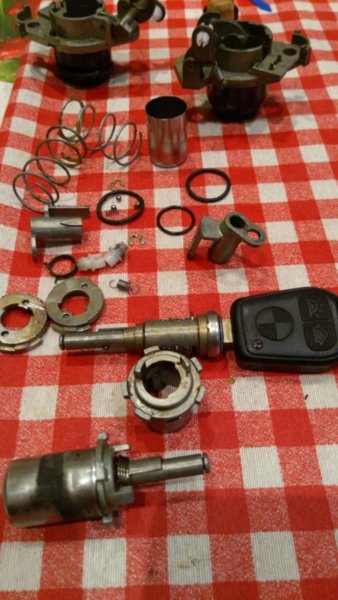
Congratulations !! if you have made it this far you have completely disassembled the lock ! and that was the easy part J
Now let’s get cracking with the fun bit.
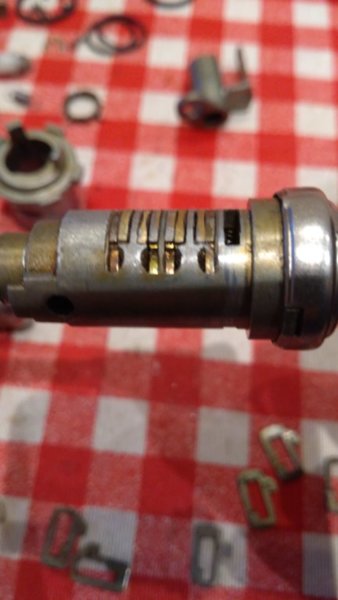
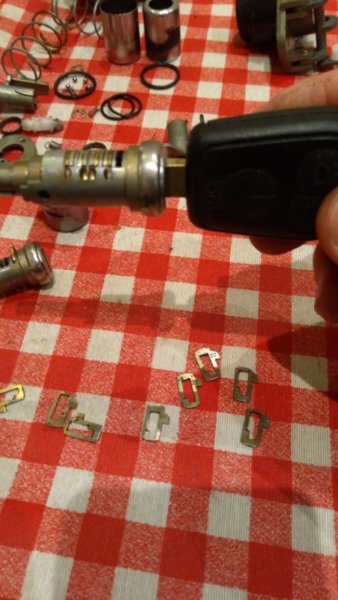
The way to match the lock to the key is quite simple, you will see that those pin plates are numbered on one side, the idea is that you try your existing key with the donor lock and starting on one side you see which pins sit flush with the tumbler when you put the key in (note that you will have to push the pins inside a little bit with your fingers to help the key go in) and make a note of those and then focus on the pins that stick out.
For the pins that stick out you start a bit of trial and error – note that the “arrow shaped” pin will always stick out no need to touch that one – say on the first position you have a number 9 plate and it sticks out on one side then you remove the key and slide a number 10 plate in that position and put the key back in, if it sticks out even more then you do the opposite and try with a pin 8 plate and hopefully in a couple of tries you can make that plate sit flush, keep repeating this with the rest of the positions in the lock tumbler. Note that plates go in from opposite sides of the tumbler in an alternative way, note also that there are small springs inside to push the pins out, don’t lose them, they normally remain in position with the lock grease.
When doing this trial and error be careful that you keep the plates from falling out when you are inserting or removing the key, or you will have plates falling all over and will have a problem remember where they were unless you are making notes of which number plates go in which positions as you go.
If you have decided to buy a lock repair kit you should have plenty of plates to match your key, if you have not and you are using plates from donor locks then you might not have enough plates to do a perfect match, in that case what you can do is file the plates a bit until they sit flush, you can test this by inserting the lock with the key inside into the lock cylinder and see if it would rotate 180 degrees very smoothly, if it doesn’t then you haven’t matched properly and you have plates sticking out and need to do some filing / grinding.
Note that I don’t recommend you go crazy with the filing or you might remove too much material and weaken the plate, do this only to go a number up or down – i.e. you need a number 8 plate but you only have a 9 or a 7, put it in the lock with the key inserted grind the excess material until the plate sit flush and see if when you insert the tumbler in the cylinder it rotates 180 degrees very smoothly. We are talking about maybe a tenth of two tenths of a millimetre here that you need to remove.
There is an “arrow” shaped plate – that remains where it is and does not need to be touched – you push that arrow down to fully insert the tumbler inside the lock cylinder.
Once you have everything matched is time to clean everything the best you can (especially if you had to do any grinding) and lubricate for reassembly.
I would love to say that reassembly it’s the reversal of the process but it’s a bit more fiddly than that.
Fiddly step one with the key inside the tumbler and once you make sure the tumbler rotates smoothly 180 on the lock cylinder you need to align the hole in the tumbler where the spring and ball bearing were with a hole in the lock cylinder body, once the holes are aligned then from the top you insert first the spring and then the ball bearing and push it down with a small screwdriver or another tool while you insert fully the tumbler inside the cylinder. If you have completed this step properly you will feel that when rotating it with the key it has a notchy operation at 90 and 180 degrees whereas previously it moved smoothly all the way across the 180 degrees with no ball bearing.
Step two once you test operation and you are satisfied it’s time to insert the cylinder in the chrome sleeve, make sure you clean everything and put the small o ring on the inside of the lip, then push the sleeve in, note that you will need to align a couple of notches that it has with some indentations on the lock cylinder so it is attached securely. Finish that step by sliding the bigger rubber o ring over the chrome sleeve until it sits on the base.
At this point you need to put in place the clock spring that you removed earlier, rotate the key all the way clockwise and then put the spring as per the picture, if you have done this successfully the key will rotate freely to the 12 o’clock position from 3 o’clock anticlockwise but you should feel spring resistance and the key should spring back to 12 o’clock when rotating it anti clockwise to 9 o’clock.
Step three now you can slide the lock cylinder inside the lock body, it only goes in one position.
Super fiddly final step four – this took me a few tries to get right, and things might/will come flying !!!
Let me try to explain this the best way possible J
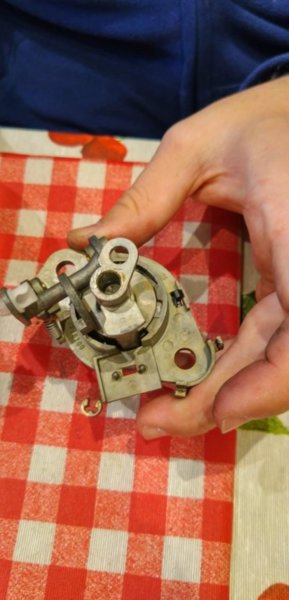
Familiarise yourself with the way things go back together first, you will need to put the big spring and then the plate that you rotated out alongside the lever pin plate sitting on top, it only goesbacl in one position so you can push it all the way in to the point that you can rotate the circular plate, note that the pin plate that sits on top goes has a cylindrical part that goes over the hole where the ball bearing and the spring were located, this is the difficult bit.
Once you have done a few tries you need to get SOMEONE to help you because you will have both hands holding the lock assembly from each side with everything slid together to the point where the hole is still visible while that person carefully puts the spring in the hole and the ball bearing, then get that person to push the ball in with a flat screwdriver from an angle across the big spring while you push the two parts of the lock together so the cylindrical part of the plate pin part goes over the ball bearing and keeps it inside. It will take you a few tries but keep the faith.
If you are lucky enough to have completed this successfully, keep holding it together and rotate the circular plate a bit, then once its holding everything together you can relax and rotate the plate to the right original place all the way.
And you are almost done! All you need now is to put the circlip back where it was and test the functionality of the lock, you should feel the notchy operation when rotating the key and also when rotating the “pin plate” arm you should be able to feel also a notchy action at the ends. If the key does not rotate 180 at this point or the arm does not rotate 90 degrees then you need to rotate the circular plate a bit more.
I tried to explain this in the best way possible, very long tutorial but I hope it helps someone J
Cheers !
Attachments
-
50.9 KB Views: 32
-
85.7 KB Views: 30
-
83.8 KB Views: 27
-
43.9 KB Views: 28
-
76.8 KB Views: 30
-
70 KB Views: 30
-
61.9 KB Views: 25
-
51.7 KB Views: 28
-
52.2 KB Views: 30
-
66.5 KB Views: 26

